Welcome to the ultimate guide on Kenmore dryer belt repair. Whether your dryer belt has snapped, worn out, or needs replacement due to other issues, we’ve got you covered. In this comprehensive article, we’ll walk you through everything you need to know to tackle this repair like a pro.
Kenmore Dryer Belt Repair: A Step-by-Step Guide
Understanding the Basics
In this section, we’ll delve into the fundamental components of your Kenmore dryer and how the belt fits into the overall mechanism. Understanding these basics is crucial before diving into the repair process.
Gathering Necessary Tools and Materials
Before you start any repair project, it’s essential to have all the required tools and materials at hand. We’ll provide you with a detailed list of everything you’ll need to successfully replace your Kenmore dryer belt.
Safety Precautions
Safety always comes first. We’ll outline important safety precautions to follow throughout the repair process, ensuring you stay protected from any potential hazards.
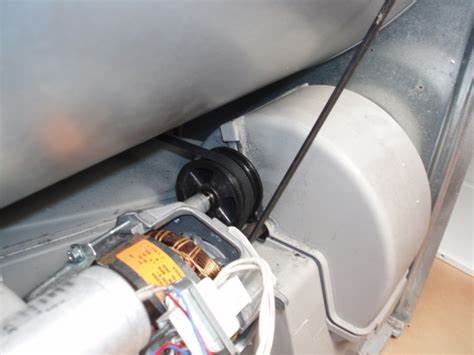
Locating the Belt
Finding the belt in your Kenmore dryer can be tricky, especially if you’re not familiar with its internal workings. We’ll guide you through the process of locating the belt with ease.
Removing the Old Belt
Once you’ve located the old belt, it’s time to remove it. We’ll provide you with step-by-step instructions on safely removing the old belt without causing any damage to your dryer.
Choosing the Right Replacement Belt
Not all dryer belts are created equal. We’ll help you select the perfect replacement belt for your Kenmore dryer, ensuring compatibility and optimal performance.
Installing the New Belt
With the old belt out of the way, it’s time to install the new one. We’ll walk you through the installation process, making it simple and straightforward.
Testing and Troubleshooting
After installing the new belt, it’s crucial to test your dryer to ensure everything is functioning correctly. We’ll cover common troubleshooting steps to address any issues that may arise.
Maintaining Your Dryer
Proper maintenance is key to extending the lifespan of your Kenmore dryer belt. We’ll provide you with valuable tips on how to keep your dryer running smoothly for years to come.
FAQs (Frequently Asked Questions)
How often should I replace my Kenmore dryer belt? Typically, dryer belts should be replaced every 5-7 years or if signs of wear and tear are evident.
Can I replace the belt myself, or should I hire a professional? With the right tools and guidance, replacing a Kenmore dryer belt is a manageable DIY project. However, if you’re unsure or uncomfortable, it’s always best to seek professional assistance.
What are some signs that my dryer belt needs replacement? Common signs include excessive noise during operation, clothes taking longer to dry, or visible wear and tear on the belt itself.
Do I need to lubricate the new dryer belt? No, Kenmore dryer belts are designed to operate without the need for lubrication.
How long does it take to replace a Kenmore dryer belt? The time required depends on your level of experience and familiarity with the process. On average, it can take anywhere from 1-2 hours.
Where can I purchase a replacement Kenmore dryer belt? Replacement belts are readily available online or at your local appliance store. Be sure to check the model number of your dryer to ensure compatibility.
Conclusion
Congratulations! You’ve successfully learned how to repair your Kenmore dryer belt like a seasoned pro. By following our expert tips and guidelines, you can keep your dryer running smoothly for years to come.